
Beacon Quarry Strategy for Deepslate and Tuff
Introduction
What a Haste Beacon Actually Changes
A beacon quarry is an organized excavation kept inside Haste II coverage, with reliable access, lighting, and storage. It works particularly well when you need large amounts of deepslate and tuff for construction. However, these blocks do not mine at the same speed: in standard modern Java and Bedrock survival, an Efficiency V diamond or netherite pickaxe with Haste II can instantly break ordinary tuff under suitable conditions, but cannot instantly break deepslate.
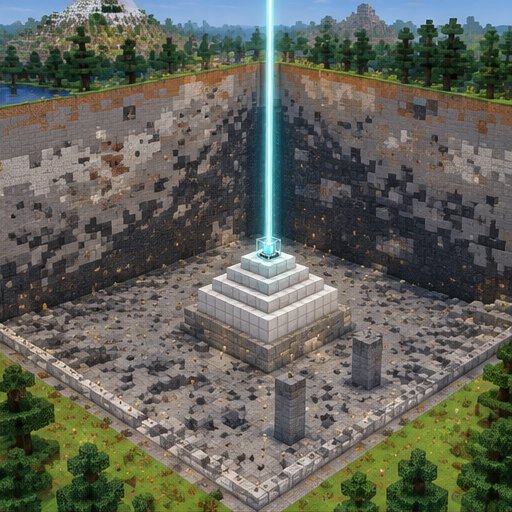
Haste II still makes deepslate excavation substantially faster. Mine while standing on solid ground, and avoid Mining Fatigue. Being airborne or submerged can reduce mining speed; Aqua Affinity addresses the underwater penalty but does not remove the separate penalty for lacking solid footing. Server lag or plugins can also change the apparent results.
Materials and Quarry Planning
Prepare one beacon and 164 valid mineral blocks for a complete four-layer pyramid: 81 for the bottom layer, then 49, 25, and 9. Iron, gold, emerald, diamond, and netherite blocks work, including mixed layers. Copper blocks do not. Bring an iron ingot, gold ingot, emerald, diamond, or netherite ingot to confirm the beacon’s power selection, plus spares for later changes.
Your main tool should be an Efficiency V diamond or netherite pickaxe, preferably with Unbreaking III and Mending. Bring a backup, food, torches, a water bucket, building blocks, and ladders or scaffolding. Carry Silk Touch and Fortune pickaxes if you want to preserve ore blocks or maximize applicable ore drops. Add shulker boxes and an ender chest if available; ordinary chests at the quarry entrance remain a practical alternative.
Deepslate becomes common below Y=0 and dominates the normal stone layers below approximately Y=-8 in modern Overworld generation. Tuff occurs in underground deposits rather than forming an unlimited continuous layer. Scout exposed caves or prospecting tunnels before committing to a quarry intended primarily for tuff. Terrain generated before the Caves & Cliffs changes may differ.
Build and Validate the Beacon
Step 1: Mark a modest first excavation area, such as 16 by 16 blocks, around a central service location. Provide a staircase or secured shaft back to your base. Keep the access route outside the excavation face so removing a layer does not strand you. Inspect nearby caves from protected openings rather than dropping into them.
Step 2: Excavate space for the pyramid and build its solid, centered layers: 9 by 9, 7 by 7, 5 by 5, and 3 by 3. Place the beacon above the center of the top layer. At underground depth, clear the beam’s vertical route to the sky. Ordinary opaque terrain blocks it; glass is suitable for a protective cap. Do not dig straight upward while standing underneath falling gravel or possible lava.
Step 3: Open the beacon interface, choose Haste as the primary power, then select the Haste II upgrade instead of Regeneration. Insert a valid payment item and confirm. A visible beam alone does not prove that Haste II is selected: check your active effects after waiting briefly within range.
Step 4: Validate coverage before expanding. A full beacon has a nominal 50-block range horizontally and downward, with its effect extending upward; exact boundary behavior should be checked in your edition and version. Place the beacon near the intended lower working levels, or plan to lower it as the quarry deepens. At each proposed edge, wait for any lingering effect to expire and confirm that Haste II refreshes there.
Excavate in Controlled Layers
Step 5: Test several ordinary tuff and deepslate blocks from solid footing. Tuff should break instantly with the stated equipment and Haste II; deepslate should remain noticeably slower. If tuff does not, check the pickaxe tier, Efficiency level, active effect, footing, and Mining Fatigue. On servers, test without rapidly sweeping the crosshair to distinguish mining behavior from block-update lag.
Step 6: Open parallel working lanes, then remove the strips between them one horizontal layer at a time. Retain temporary walkways around the service area and access shaft. Deepslate and tuff do not require structural support: pillars are useful as markers or barriers, not as protection against a general cave-in mechanic. Gravel and sand overhead can fall, so inspect exposed ceilings.
Step 7: Light newly exposed floors and cave entrances immediately. Modern standard Overworld hostile spawning generally requires block light level zero, but older versions and special spawning sources differ. Seal unexamined cave openings. If lava appears, stop, retreat onto intact flooring, and contain it with blocks before continuing. Water helps control exposed flows but does not make an unseen cavity safe.
Handle Drops, Repairs, and Expansion
Step 8: Choose drops deliberately. Ordinary mining produces cobbled deepslate; Silk Touch produces deepslate itself. Tuff drops tuff with a suitable pickaxe, and Fortune does not multiply either building material. Reserve Fortune for relevant ores. Sort building blocks and valuables into separate boxes, and collect loose drops promptly instead of leaving them behind across the quarry.
Step 9: Watch durability and return to a dependable experience source for Mending repairs. Mining ordinary tuff and deepslate provides no repair experience. Retrieve an ender chest with Silk Touch if you want the chest back intact. Use secured ladders, stairs, or continuous scaffolding for vertical travel; scaffolding does not make arbitrary falls harmless.
If beacon construction or beam access is impractical, use the same layered quarry with Efficiency V tools and smaller working sections. It will be slower, especially for tuff, but remains dependable without special server mechanics or edition-specific exploits.
Please support us by visiting one of our partners: Amazon