
Cave Spider XP Farm Without the Poison
Introduction
What Actually Makes This Farm Safer
A cave spider spawner in an abandoned mineshaft can supply string and experience, but its collection window needs more care than a zombie farm. Cave spiders are roughly 0.7 blocks wide and 0.5 blocks tall, fit through surprisingly small openings, and climb walls. A one-block chute does not contain them, and a half-block slab gap is not a dependable escape barrier.
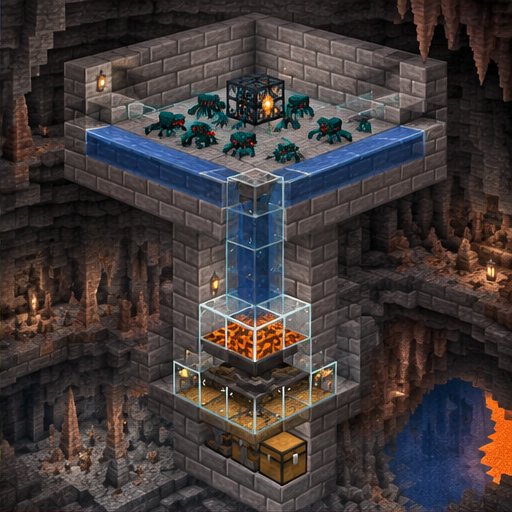
The practical approach is an enclosed spawning room, water transport, and a fenced attack window with a marked standing position. The barrier prevents escape; distance prevents bites. Treat “without the poison” as a goal to validate, not a guarantee. Cave spider attacks cause poison on Normal and Hard difficulty, but not Easy. Peaceful cannot run this hostile-mob farm.
Materials and Site Planning
Bring a pickaxe, a sword for clearing cobwebs, plenty of temporary lighting, solid building blocks, glass for inspection, two water buckets for a renewable water source, and wooden fences. For a basic collection point, bring one hopper and one chest; enlarge collection only if drops consistently land elsewhere. Slabs and trapdoors are useful for walkways and controlled water transitions, but are not automatically spider-proof.
Carry food, armor, a shield, and a milk bucket. Drinking milk removes poison along with other status effects; it does not restore lost health. Keep your escape route clear and your valuables outside the construction area.
These principles apply to Java and Bedrock, but spawning checks, water details, collision behavior, and combat differ between versions. Server plugins can also change spawners. Build an accessible prototype rather than sealing everything permanently before testing.
Build the Farm in Controlled Stages
Step 1: Secure the mineshaft. Block side tunnels, remove nearby spiders, and illuminate the spawner chamber heavily. Lighting a distant tunnel does not disable the spawner itself, and one torch is not a dependable construction safeguard. Observe the chamber for fresh spiders before excavating. Never break the spawner: in normal survival, you cannot pick it up and relocate it.
Step 2: Clear the spawning space. A common starting chamber is nine blocks wide by nine blocks long, centered horizontally on the spawner, with two clear blocks above it and a floor about three blocks below it. This accommodates the usual Java spawner footprint and provides falling space, but should not be treated as an optimized Bedrock blueprint. Remove cobwebs inside the chamber because they trap spiders and interrupt transport. Enclose every opening with solid blocks or glass.
Step 3: Establish a reliable water path. Make a shallow collection trench along one edge of the floor. Place water sources along the opposite edge and let the flow push spiders toward the trench. Water spreads only a limited distance on level ground, so inspect the final floor blocks for dry spots or stationary water. Where necessary, shorten the run or lower the trench to renew the flow. Route the trench toward a small holding pocket rather than leaving a broad area where spiders can collect out of reach.
Step 4: Build the holding pocket and barrier. Start with a one-block-wide pocket behind a wooden fence connected to solid blocks on both sides. Place a full block directly above the fence position, and close the pocket’s roof and corners. A fence provides collision that cave spiders cannot simply squeeze through, while its visible gaps may allow attacks. Do not substitute an open fence gate. Keep the pocket inspectable through glass and provide a maintenance entrance that stays blocked during operation.
Step 5: Install collection beneath the pocket. Place a hopper where spiders and drops finish their journey, pointing into an accessible chest. For the first test, leave the hopper top exposed rather than covering it with a full block, which prevents ordinary pickup through that block. Keep the chest reachable from the safe side. Hoppers collect items, not experience orbs.
Step 6: Establish the attack position. Stand back from the fence and aim through a low visible gap toward the spiders’ bodies. Find a position where attacks connect without walking against the barrier, then mark it with contrasting floor blocks. Do not assume a fence stops melee damage across it. If your edition’s targeting or reach makes this awkward, rebuild the window rather than edging into bite range.
Step 7: Activate and test cautiously. Remove temporary lighting from outside where possible, then remain within 16 blocks of the spawner’s center to activate an ordinary monster spawner. Admit only a small initial group. Check escape routes, successful hits, chest contents, and whether XP reaches your standing position. Keep an emergency solid block ready to close the window. Direct player kills reliably provide XP; environmental deaths alone generally do not.
Troubleshooting and Edition Differences
If spiders stall, look for remaining cobwebs, dry ledges, opposing water flows, and climbable corners. Water does not prevent wall climbing. Simplify the chamber and avoid projecting blocks that give spiders resting places. If production pauses, kill the accumulated spiders: nearby cave spiders can trigger the spawner’s local entity limit. Lighting the entire mineshaft is useful for safety, but is not the main rate improvement for a spawner farm.
Java’s Sweeping Edge enchantment can help clear groups; Bedrock has neither that enchantment nor Java-style sweeping attacks. Avoid excessive accumulation rather than relying on crowd damage or entity cramming, which differs between editions.
If a safe melee window cannot be validated, use a fully contained ranged-kill arrangement with a tested narrow firing opening and retrieve XP only after the pocket is empty. It consumes ammunition and is slower, but is preferable to an unreliable “poison-proof” slit.
Please support us by visiting one of our partners: Amazon