
Finding Slime Chunks In-World
Introduction
What This Method Actually Tests
You can identify slime chunks in survival without a seed map by building illuminated underground spawning floors and watching for slimes. A chunk is a 16-by-16-block column. Roughly one in ten chunks is designated a slime chunk, but testing ten chunks does not guarantee a discovery. In modern Java Edition, the selection depends on the world seed; Bedrock Edition uses a different selection system. Do not transfer Java results to Bedrock.
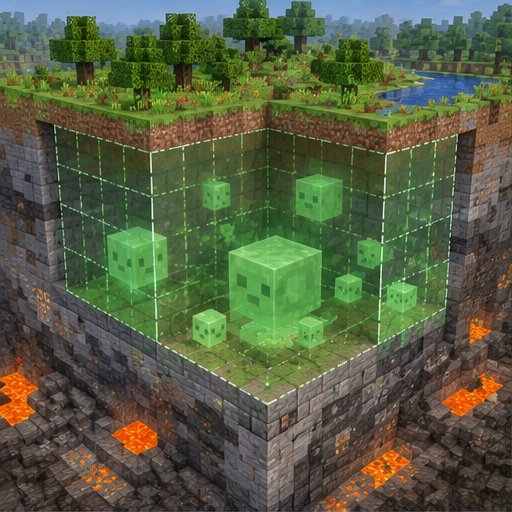
In slime chunks, slimes can spawn below Y=40 regardless of light level. This makes a brightly lit underground chamber useful: lighting prevents most ordinary hostile mobs from spawning while leaving slime spawning possible. A confirmed spawn is evidence; an empty platform after a short wait is not proof that the chunk is unsuitable.
Materials and Site Preparation
Bring a good pickaxe, torches or other lighting, full solid building blocks, glass for viewing barriers, bottom slabs for access routes, food, and weapons. Ladders or stairs provide a safe exit. An iron pickaxe or better is useful for valuable ores encountered during excavation. Bring spare tools rather than assuming one pickaxe will finish several chambers.
A complete 16-by-16 replacement floor requires 256 blocks, although intact stone can serve as the floor. You also need three clear air layers above it. Glass is for observation and containment, not spawning floors. Bottom slabs prevent spawning on walkways; do not cover the test floor with them.
Choose an ordinary underground location away from mushroom fields and deep dark biomes, whose hostile-spawning restrictions can complicate testing. Avoid placing the test directly beneath a busy multiplayer base: other players and loaded mobs can affect spawn opportunities.
Step-by-Step Chunk Testing
Step 1: Establish chunk boundaries. In Java Edition, use F3+G to display them where debug shortcuts are available. In Bedrock, enable Show Coordinates if permitted and calculate boundaries: chunk edges occur at X and Z coordinates divisible by 16. For example, X=32 through 47 and Z=80 through 95 form one chunk. Negative coordinates require care: X=-16 through -1 is one chunk, not X=-15 through 0.
Step 2: Excavate one candidate chamber, then add nearby candidates if practical. Put floor blocks at Y=30, so mobs stand with their feet at Y=31, comfortably below the cutoff. Clear Y=31, 32, and 33 above the floor. This gives large slimes sufficient vertical space. Keep the spawning surface full-block, dry, and free of carpet, rails, bottom slabs, and other obstructions.
Step 3: Separate candidate chunks with solid walls or glass barriers aligned to their boundaries. Barriers occupying edge blocks reduce usable spawning space, but make identification more reliable. Slimes can wander between open chambers, so finding one in a shared excavation does not prove which chunk produced it. Provide viewing windows and doors you can close securely.
Step 4: Light each chamber thoroughly. In current mainline versions, most ordinary Overworld hostile mobs require complete darkness, but older versions have different thresholds. Spread lighting across the room rather than relying on one entrance torch. Wall or ceiling lighting preserves more floor space. Slimes ignore light for underground slime-chunk spawning; darkness is unnecessary.
Step 5: Build a protected observation or waiting position more than 24 blocks from the nearest spawning surface. Measure three-dimensional distance, not just the corridor length. Keep every candidate within your edition’s active spawning area. Java normally allows hostile spawning out to 128 blocks from a player, subject to ticking and server conditions. Bedrock spawning distance depends strongly on simulation distance; at simulation distance 4, the useful range is approximately 24–44 blocks. A compact, individually tested chamber is safer than a sprawling array.
Step 6: Observe on Easy, Normal, or Hard difficulty, with natural mob spawning enabled. Peaceful difficulty cannot validate this test. Wait for several spawning cycles, inspect through the glass, and repeat rather than assigning a fixed timeout. Kill confirmed slimes safely before continuing: larger slimes split into smaller ones. Record the chamber’s X/Z bounds and the edition and version used.
Step 7: Improve surrounding spawn conditions before excavating extensively. Light accessible nearby caves, contain dangerous openings, and spawn-proof your waiting platform with bottom slabs. This reduces competing hostile mobs; it does not force a slime spawn. Full perimeter excavation is unnecessary for identification. Expand testing to additional chunks if the existing candidates remain inconclusive.
Troubleshooting and Safe Validation
If nothing appears, first check difficulty, floor height, floor blocks, three-block clearance, and player distance. Confirm that the chamber remains simulated while you wait. If zombies or skeletons appear, fix lighting before interpreting the result. If all hostile spawning seems absent, ask the server operator whether plugins, mob limits, or spawning rules differ from vanilla.
Do not identify a chunk from a slime seen in an open connecting tunnel. Isolate the candidate and watch again. For a risky redesign, use a separate copy of the world to check dimensions before committing survival resources; preserve the original save. Copy testing cannot reproduce different multiplayer settings reliably.
After Finding a Chunk
Mark the confirmed boundaries permanently and retain the lit test chamber until it produces repeat sightings. Then expand within those boundaries, keeping spawning floors below Y=40 and checking edition-specific farm mechanics before adding collection systems. If underground testing remains impractical, hunt slimes in a regular swamp at night instead. Swamp spawning uses different height, light, and moon-phase conditions, so it supplies slimeballs without proving a slime chunk.
Please support us by visiting one of our partners: Amazon