
Archaeology and Pottery Sherds: Brushing Suspicious Blocks
Intro (Java & Bedrock, 1.20+)
Archaeology in Minecraft is a focused exploration-and-collection mechanic built around finding special “suspicious” blocks and carefully brushing them to extract loot. It ties together world exploration, environmental storytelling, and decorative crafting—especially the creation of decorated pots from pottery sherds (sometimes called pottery shards in older discussions). This guide explains what you can get, where to look, exactly how brushing works, and how to avoid the mistakes that cause players to lose rare drops.
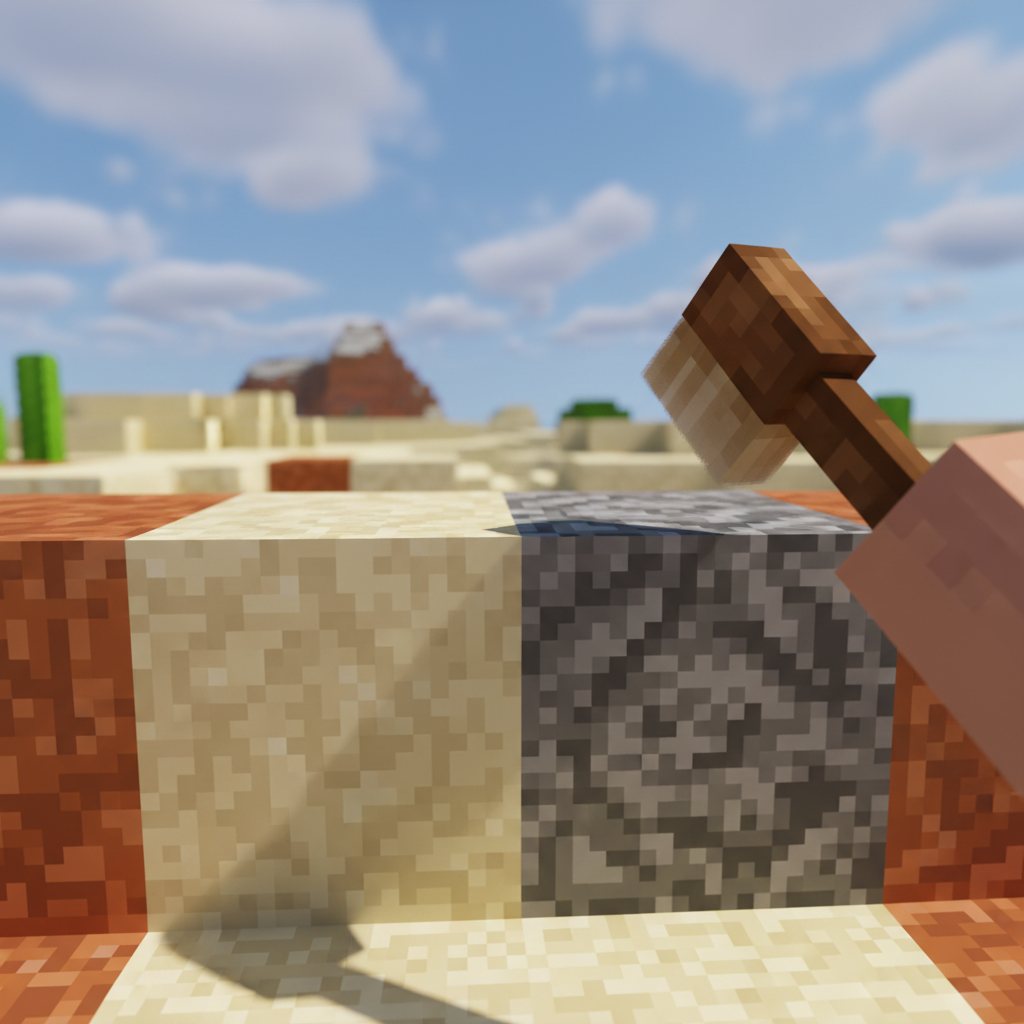
What You Get
Brushing suspicious blocks can yield a mix of practical items, collectibles, and purely decorative archaeology rewards. The exact loot depends on the site and the suspicious block type, but the overall categories stay consistent across supported versions.
Primary archaeology rewards include:
Pottery sherds (used to craft decorated pots). Each sherd has a pattern (for example, various themed motifs) that becomes a “side” on the final pot.
Sniffer egg (a rare, high-value find associated with archaeology). When hatched, it leads to the Sniffer mob and ancient plants gameplay loop.
Music discs and other collectible items (site-dependent).
Utility and resource items such as basic materials and occasionally valuables (site-dependent, and not guaranteed).
Decorated pots as an end-goal: When you collect pottery sherds, you can assemble them into decorated pots. Pots are decorative blocks that can display the patterns you discovered. You can also craft a plain pot without sherds (using bricks), but archaeology is how you get the patterned variants.
Why archaeology is worth doing even if you don’t care about decoration: You can obtain unique items (notably the sniffer egg) and engage in a structured exploration activity. It also provides a “treasure hunt” style objective with tangible visual artifacts you can show off in builds.
Requirements & Version Notes (Java vs Bedrock)
Archaeology is available in modern Minecraft versions that include the brush item, suspicious sand, suspicious gravel, and archaeology structures. The features were introduced around the Trails & Tales era and have continued to exist in later versions. If you are playing on an older world or older game version, you may need to update your world or explore newly generated chunks to find archaeology sites.
General requirements:
A version of Minecraft that includes archaeology (brush, suspicious sand/gravel, and the related structures).
Access to the correct biomes/structures (such as deserts for wells/temples and the locations that generate trail ruins).
A brush (crafted from common early-game materials) and enough time to carefully excavate without breaking suspicious blocks.
Java vs Bedrock notes (what typically differs):
World generation and structure frequency can feel different between editions and seeds. Even if a structure exists in both editions, the rate at which you find it and the exact layout may vary.
Loot tables are intended to be consistent in purpose, but minor differences can exist between editions or across updates. If you’re targeting a specific sherd or rare item, consider checking your exact version’s official changelog or in-game experimentation.
Controls and interaction feel (timing, button-holds, controller sensitivity) can differ, which matters because brushing is a time-based action that can be interrupted.
Important world-gen note: Archaeology blocks and sites are found in the world as generated content. If you updated an old world, archaeology structures and suspicious blocks are most reliably found in newly generated chunks (areas you have never visited before). Existing chunks generally do not retroactively gain brand-new generated archaeology sites unless your platform or world-editing tools specifically regenerate terrain.
Materials
Before you go hunting, gather these materials and tools. Some are required, others are strongly recommended to prevent loss of loot and to speed up safe excavation.
Brush (required) – the tool used to extract items from suspicious sand and suspicious gravel.
Shovel (recommended) – for clearing normal sand/gravel around a site; avoid using it on suspicious blocks.
Pickaxe (recommended) – for navigating structures safely and removing stone/blocks around a dig area.
Torches or other light sources (recommended) – to prevent mob spawns while you excavate slowly.
Blocks for scaffolding (recommended) – to support sand/gravel areas and create safe platforms.
Food (recommended) – excavation often involves travel and time spent in dangerous areas.
Chests or shulker boxes (recommended) – to store sherds and rare finds securely.
Bed (optional) – set spawn point near a dig site to reduce risk if you die.
Water bucket (optional) – useful for mobility and safety, though not a direct archaeology requirement.
How the Mechanic Works
Archaeology revolves around two special blocks: suspicious sand and suspicious gravel. They look slightly different from normal sand/gravel and appear in specific structures and dig sites. The key rule is simple: do not break suspicious blocks if you want the archaeology loot. Instead, you must use a brush on them.
Core concept: When you brush a suspicious block, you “excavate” it over a short period. As you progress, the block shows a brushing animation and gradually reveals an item. When the brushing completes, the item pops out and the suspicious block is consumed (it does not remain as suspicious; it effectively turns into a normal block state or disappears depending on the exact behavior in your version—what matters is that it is a one-time extraction).
Brushing is deliberate and interruptible: The action takes time and can be interrupted if you stop using the brush, get knocked back, or move away. Being interrupted isn’t automatically a problem, but repeated interruptions can make excavation annoying and can increase the chance you accidentally break the block out of impatience.
Loot is tied to the site: Different archaeology sites have different loot tables. This is why it matters where you dig. If you are hunting a particular pottery pattern or a rare item, you should focus on the correct type of location and keep excavating suspicious blocks there.
Suspicious blocks are fragile in practice: Even though the suspicious block itself is a block, it is easy to accidentally destroy it with the wrong tool, by mining too quickly, or by causing it to fall (if it is a gravity-affected block). Treat suspicious sand and suspicious gravel as “artifact containers” rather than normal building blocks.

Step-by-Step: Brushing Suspicious Blocks (8–12 Detailed Steps)
Step 1: Confirm you are in a version that supports archaeology and plan to explore new terrain if your world is old. If your world existed before archaeology was added, head far enough out that the game generates fresh chunks. This is often the difference between “I can’t find suspicious blocks anywhere” and “I found a whole site.” If you are on a server, note that the server’s world border, pregenerated regions, or exploration history can limit how much new terrain exists.
Step 2: Craft and pack at least one brush, plus backups if possible. Brushes have durability, and archaeology sessions can be long—especially if you find a rich site like a trail ruin. Even if you are confident, bring a second brush so you do not have to abandon the dig mid-way. Also pack torches, blocks for scaffolding, and a chest (or shulker box) to store pottery sherds and rare items immediately.
Step 3: Locate an archaeology site and secure the area. Common targets include desert wells, desert temples, and trail ruins. As you approach, light up the surroundings and clear obvious threats. Archaeology encourages slow, careful play—exactly the pace that can get you surprised by mobs at night or in dark corners. Place torches, block off dangerous openings, and consider setting a bed nearby so an accident doesn’t end the entire expedition.
Step 4: Learn to visually identify suspicious sand and suspicious gravel before you start digging aggressively. Suspicious blocks have distinct textures compared to their normal counterparts. Spend a moment comparing nearby normal sand/gravel to the suspicious variant so you do not accidentally shovel through your target blocks. If you are unsure whether a block is suspicious, treat it as suspicious: stop using fast tools and switch to careful clearing.
Step 5: Expose suspicious blocks safely by clearing surrounding normal blocks first. Use your shovel on normal sand and your pickaxe on stone, but keep a strict rule: do not directly mine the suspicious block with a shovel or pickaxe. If the suspicious block is embedded in a wall of sand/gravel, remove neighboring blocks to give yourself room to stand and to avoid causing collapses. Gravity blocks can fall; if you remove support beneath sand or gravel, you can create a chain reaction that complicates excavation and can bury items or obscure the suspicious blocks.
Step 6: Stabilize the dig site before brushing if you suspect a collapse risk. If suspicious sand is part of a larger sand pile, consider placing temporary support blocks around it, building a small platform to stand on, or creating a “frame” so that when you clear other sand, you don’t leave floating layers that suddenly drop. The goal is not to overbuild—it’s to prevent accidental falls, rushed mining, and chaotic block updates that distract you mid-brush.
Step 7: Brush the suspicious block carefully and completely. Stand close enough to interact with the block, then use the brush on it. Maintain the brushing action until the excavation completes. You should see visual feedback as the item is gradually revealed. If you stop brushing partway, you can resume; however, staying consistent reduces the chance a mob hits you, you misclick, or you panic and break the block with the wrong tool. If enemies appear, back off, deal with them, then return—your suspicious block won’t “time out” just because you stepped away.
Step 8: Collect the item immediately and confirm what you received before moving on. When the brushing completes, the item pops out as an item entity. Pick it up, then open your inventory and verify what it was—especially if you are hunting pottery sherds. If you are excavating in a place with lots of loose blocks (sand/gravel) or water flows, it is easy for dropped items to land somewhere awkward. Immediate pickup and verification prevents “I think I got a sherd but it disappeared” confusion.
Step 9: Work methodically through the site rather than randomly. Archaeology locations often contain multiple suspicious blocks in a small area. Create a simple pattern: clear an area, identify suspicious blocks, brush them one by one, then move to the next section. This disciplined approach helps you avoid missing blocks (especially ones partially hidden behind normal sand/gravel) and reduces accidental destruction caused by impatience.
Step 10: Manage inventory and preserve artifacts as you go. Pottery sherds and other finds can accumulate quickly. If you are far from base, place a chest and store valuables periodically. If you die, this can be the difference between losing unique finds and recovering them. Also consider separating pottery sherds by type (patterns) so you can plan your decorated pot designs later without having to sort a huge pile.
Step 11: Repeat excavation across multiple sites if you are collecting specific pottery patterns. Because the loot is randomized within a site’s table, you may need to brush many suspicious blocks to complete a set of sherd patterns you want. When a site is exhausted, mark it on your map and move on to another location. In long-term worlds, players often create an “archaeology route,” revisiting newly generated terrain after each major update to find additional sites.
Step 12: Craft and display your decorated pot once you have enough sherds, and keep your rarest spares stored. A single decorated pot uses four pottery sherds—one per side. Choose combinations that tell a story (all one theme, or a mix to represent your adventure). Keep extra sherds in storage; they are compact collectibles and useful if you later redesign a build, create themed rooms, or want to craft multiple matching pots.

Testing Your Result
After you finish brushing and collecting, it helps to “test” your results in practical, verifiable ways so you know the expedition succeeded and you didn’t miss anything important.
Test 1: Confirm loot pickup and prevent loss. Open your inventory and verify that the items are actually in your possession. If you brushed multiple blocks quickly, ensure nothing is still lying on the ground. Items despawn after a time if left unloaded or ignored, so do a final sweep of the dig area.
Test 2: Validate pottery sherd collection for crafting. If your goal was a decorated pot, confirm you have at least four pottery sherds available. If you are collecting specific patterns, separate them into a chest and count duplicates. This immediately tells you whether you should keep searching the same site type or switch locations.
Test 3: Craft a decorated pot (functional check). Use a crafting table and place four pottery sherds in the crafting grid to produce a decorated pot. If you instead use bricks, you will craft a plain pot rather than a decorated one. Make sure the output preview shows a decorated pot with patterns, indicating you used sherds successfully.
Test 4: Place and visually inspect the pot. Place the decorated pot in your base or workshop and rotate around it. Each side should display the pattern of the corresponding sherd used in crafting. If the sides don’t match what you expected, note the combination you used and try again with a different arrangement. (In normal play, you can always craft additional pots if you have extra sherds.)
Test 5: Site completion check (optional). If you want to be thorough, walk the site again and look for suspicious blocks you may have missed, especially ones partially buried or visually obscured. Trail ruins, in particular, can hide suspicious gravel in clusters; slow, layered excavation tends to reveal more than random digging.
Common Mistakes (and How to Avoid Them)
Mistake 1: Mining suspicious blocks with a shovel or pickaxe. This is the most common failure point. If you break a suspicious block like a normal block, you usually forfeit the archaeology loot that brushing would have produced. Fix: Put your shovel away when you see suspicious textures; keep the brush on your hotbar and switch deliberately.
Mistake 2: Digging too fast and collapsing sand/gravel. Even if collapsing doesn’t directly destroy suspicious blocks in every scenario, it can bury them, obscure them, and cause you to panic-mine. Fix: Clear in layers, keep a stable platform, and avoid undermining large sand/gravel masses until you’ve identified suspicious blocks.
Mistake 3: Brushing while unsafe (mobs, fall risk, lava, or tight spaces). Brushing takes time. If you are brushing in a dark area or at the edge of a drop, you’re likely to be interrupted or killed, which can lead to lost items. Fix: Light the area first, make space, and clear threats before you start a long brushing session.
Mistake 4: Leaving dropped artifacts on the ground. If you brush multiple blocks and do not pick up items promptly, you risk despawn or losing them among dropped sand/gravel. Fix: Pick up and inventory-check after every brush, or at least after every couple of blocks.
Mistake 5: Expecting one site to provide every pottery pattern. Archaeology rewards are randomized. You might get duplicates or go many blocks without the one pattern you want. Fix: Treat sherd collecting as a long-term goal—collect duplicates, trade with friends (if on multiplayer), or keep exploring new sites.
Mistake 6: Searching only in already-explored areas of an old world. If your world predates archaeology, the best sites are usually in newly generated chunks. Fix: Travel far enough to generate new terrain (nether travel can speed this up), then search for the structures again.
Variants & Upgrades
Archaeology itself is straightforward—brush suspicious blocks to extract loot—but you can “upgrade” your approach in several ways depending on your playstyle.
Variant 1: The minimalist early-game approach. Bring only a brush, food, a few torches, and a chest. Focus on nearby desert wells/temples if you spawn in or near deserts. This is effective for players who want quick access to the mechanic without a major expedition. The tradeoff is higher risk: fewer backup tools and less ability to secure the site.
Variant 2: The controlled excavation approach (recommended for trail ruins). Bring scaffolding blocks, extra lighting, and multiple brushes. Excavate in horizontal layers, placing temporary support blocks where needed. This approach is slower but produces the best results in complex sites where suspicious gravel can be abundant and hidden.
Variant 3: The expedition approach (long-range, multi-site run). Use maps, beds, and storage to run an archaeology “tour,” hitting multiple sites across biomes. This increases the number of suspicious blocks you can brush per hour and is the most reliable way to build a large sherd library for decorating builds.
Upgrade 1: Better travel logistics. Use nether travel to cover long distances quickly when searching for new chunks and new sites. This is not an archaeology mechanic, but it dramatically improves efficiency when you are hunting rare finds or specific site types.
Upgrade 2: Storage discipline. Create a dedicated “artifact vault” at your base with labeled chests for pottery sherd types, rare drops, and duplicates. Archaeology rewards are compact but can become numerous, and good organization makes crafting decorated pots much more enjoyable.
Upgrade 3: Multiplayer specialization. On servers, one player can focus on site location and security while another brushes. This reduces interruption and speeds up the process. Players can also swap duplicate sherds to complete sets faster. (The exact ease of trading depends on your server rules and whether players agree to share rare finds.)
Upgrade 4: Building integration. Instead of treating archaeology as separate content, incorporate the dig site into a build: a research camp, a museum, or a workshop where you display decorated pots and store your sherd collection. This doesn’t change mechanics, but it turns your results into a lasting part of your world.
Performance / Safety Notes
Performance considerations: Archaeology sites can involve a lot of loose blocks (sand/gravel) and item entities if you excavate quickly and let items pile up. On lower-end devices (often more noticeable on some Bedrock platforms), too many dropped items or frequent block updates from falling sand/gravel can cause lag. To reduce lag, pick up items immediately, avoid triggering huge collapses, and store items in chests frequently.
World safety: Digging in structures can expose hidden cavities, spawn areas, and hazards. Light everything as you go. If you excavate deep or under unstable material, build safe stairs and platforms. If you are in Hardcore (Java) or playing with high stakes, treat archaeology as a high-attention task rather than something you do while distracted.
Item safety: If you die during an excavation, your items can despawn. Consider setting a spawn point nearby and storing artifacts regularly. If you’re in multiplayer, be mindful that other players can accidentally mine suspicious blocks or pick up drops—communicate before you excavate in shared areas.
Suspicious block safety: The safest mindset is: suspicious blocks are “containers” that must be opened with a brush. Do not rely on instincts you built for normal mining. Slow down whenever you recognize suspicious textures.
FAQ
What are suspicious sand and suspicious gravel, and how are they different from normal blocks?
They are special variants of sand and gravel that generate in archaeology locations. They have distinct textures and are meant to be brushed, not mined normally, to extract items. Normal sand/gravel doesn’t contain archaeology loot and is handled with typical mining tools.
Do I have to use a brush, or can I use a shovel with Silk Touch?
You must use a brush to extract archaeology loot from suspicious blocks. Silk Touch is not a substitute for brushing in normal gameplay. If your goal is the item inside, brushing is the intended and required method.
Can I move suspicious blocks to my base and brush them there?
In standard survival play, archaeology is designed around brushing the suspicious blocks where you find them. Whether you can move suspicious blocks as items depends on the exact version and mechanics, and it may not behave like normal blocks. If you are unsure for your edition/version, assume you should brush them on-site to avoid losing the opportunity for loot.
Why did my suspicious block disappear or fail to give me anything?
The most common reasons are: you accidentally mined it with a normal tool, it was destroyed during chaotic digging, or you interrupted the process and then broke it out of impatience. Another possibility is that you brushed it successfully but didn’t notice the item drop and it landed somewhere nearby. Always brush carefully and confirm pickups immediately.
Do archaeology sites regenerate their suspicious blocks?
No. Suspicious blocks are part of world generation and are finite. Once brushed (or destroyed), they do not naturally regenerate. To find more, you must locate additional sites or explore new terrain.
Are pottery sherds the same as “pottery shards”?
Yes in practice: many players and older discussions use “shards,” but the in-game term in modern versions is “pottery sherds.” They function as collectible pattern pieces used for crafting decorated pots.
How do I craft a decorated pot from pottery sherds?
Use a crafting table and craft a pot using four pottery sherds so the result is a decorated pot. If you use bricks instead, you craft a plain pot. After crafting, place the decorated pot and inspect each side to see the sherd patterns you chose.
Can I choose which pattern I get from a suspicious block?
No. The result is randomized from the loot table associated with that site and block type. You can influence outcomes only indirectly by choosing which sites you excavate and by brushing more suspicious blocks.
What’s the best way to find archaeology locations efficiently?
Travel to biomes and structures known for archaeology, and prioritize newly generated chunks if you’re on an older world. Bring supplies to run multiple sites in one trip, and excavate methodically so you don’t miss suspicious blocks. If you play with friends, splitting roles (security vs brushing) speeds things up.
Is archaeology the only way to get a sniffer egg?
The sniffer egg is strongly tied to archaeology progression and is intended to be found through brushing suspicious blocks in appropriate sites. If your version includes alternative acquisition methods (for example via commands or special map content), that would be outside normal survival gameplay. In typical survival, archaeology is the source.
Do Java and Bedrock have the same archaeology loot?
They are designed to be broadly equivalent, but minor differences can exist depending on the exact update version and edition-specific adjustments. If you are targeting a very specific item or pattern, verify against your exact version’s official notes or test by brushing a sample size of suspicious blocks in your world.
How can I avoid accidentally breaking suspicious blocks?
Keep the brush on your hotbar and switch to it as soon as you suspect a block is suspicious. Slow down around dig sites, clear normal blocks first, and avoid using fast mining habits. Lighting the area and building safe platforms also reduces panic-misclicks caused by mobs or falls.
Final tip: Archaeology rewards patience. The players who get the best collections are not necessarily the fastest miners—they are the ones who keep sites safe, brush methodically, and treat every suspicious block like it contains something rare until proven otherwise.
Please support us by visiting one of our partners: Amazon